We’ve all taken photographs where we wish things weren’t the way they are. Maybe the building is too far away, or there are people you wish weren’t in the picture. Content-Aware Fill is a great Photoshop tool that can help you fix these issues without too much trouble.
In most situations, Adobe Photoshop will outperform Lightroom when it comes to removing objects like these from a picture. In reality, it still has the best pixel-level adjustments in the business.
There are a variety of methods to remove objects in Photoshop, but with the rise of AI in today’s photo editing market, Photoshop‘s new content-aware fill workspace adds a lot more control to what was previously a fully automated operation.
The tool isn’t flawless, especially when there is a complicated background – but if you despise making time-consuming selections in Photoshop for object removal, the content-aware fill tool might potentially save you a lot of time.
Content-Aware Fill is a tool that was introduced in Photoshop CS5. It allows you to quickly remove objects or areas from an image by replacing them with content from the surrounding area.
Let’s have a look at how it works and when you should use it.
Contents
What is Content-Aware Fill, and how does it help me
Photoshop provides a variety of options to remove unwanted objects or eliminate undesirable elements from a photo. I use Content-Aware Fill to tell what I want Photoshop to move or delete, and the program takes care of the rest. Adobe Photoshop analyzes the space and extracts pixels that may be utilized in it.
Content-Aware Fill in Photoshop is guided by a sophisticated algorithm. These tools become more effective with each release of Photoshop. Some of the techniques I’ll show you are only available in the most recent versions of Photoshop. If you haven’t yet upgraded to Photoshop 2022, now is the time!
First, I’ll show you the Patch tool’s Content-Aware Fill option. I’ll then use the Content-Aware Move tool. Finally, I’ll show you the most recent addition, the Content-Aware Fill workspace. This workspace first appeared in Photoshop CC 2019.
When Should you Use Content-Aware Fill
There are many Photoshop commands and procedures for moving or removing items. The problem is finding which tool will be appropriate for the photo you’re dealing with. The Spot Healing Brush is a great instrument for erasing marks or tiny things on your image. I usually use this tool to remove flaws from a portrait.
You can use Content-Aware Fill in Photoshop to remove objects from a photo. This can be a great time-saver if you don’t want to make a selection and use the Clone Stamp tool.
In other cases, I might have to use Content-Aware Fill in Photoshop to cover an area with texture so it matches the surrounding area.
Photoshop does a wonderful job of replacing pixels when colors and textures are consistent.
In more advanced images, Photoshop may have difficulties and cause unusual artifacts in your picture. The Patch tool allows you to pick out replacement pixels.
The redesigned Content-Aware Fill workstation was created with a higher degree of precision. The workspace allows you a lot of leeway in picking the replacement pixels. Take a look at the before and after pictures.
The Content-Aware Move tool makes it simple to transport items from one place in an image to another, or even to a different picture. The chosen item is moved and incorporated into the photo. After that, Photoshop uses Content-Aware Fill to fill up the gap.
It’s best to follow along with an image of your own, just as with any tutorial. It’s time to have some fun moving and deleting things! Locate a picture that you can work with, open the most recent version of Photoshop, and let’s get started!
How to Use Content-Aware Fill
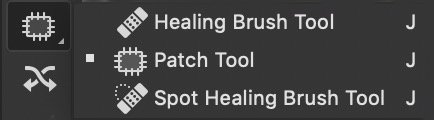
Locate Content-Aware Fill Tools
Let’s start by finding the Content-Aware Fill tools we’ll be using. The Patch tool and the Content-Aware Move feature are both accessible from the toolbar. The Patch tool icon is a rectangle with three lines cutting through each side. The Content-Aware Move tool are two arrows crossing each other.
If your toolbar isn’t showing up, click the Windows dropdown menu and select “Tools.” If I mention a Photoshop tool that isn’t visible on your toolbar, go to Edit > Toolbar. Drag any hidden tools from the right column to the left column. You are free to arrange tools however you choose.
When you choose the Patch tool, pick Content-Aware Fill from the Options bar. The options in the Options bar for both the Patch and Content-Aware Move tools include “structure” and “color.” I’ll get into them later in this post.

To access the Content-Aware Fill workspace, first, select an object. Right-click the image, then choose Edit>Content-Aware Fill. If the Content-Aware Fill option is disabled, use a selection tool like the lasso (keyboard shortcut “L”) to identify your content. This should turn on the command.
Let’s begin by learning how to use the Patch tool’s Content-Aware Fill option.
Content-Aware Patch Tool
When removing something from an image, one of the first tools I use is the Patch tool.
Step 1 – Selection
I’ll start by making a copy of my photo in a new layer. It’s a good practice to create a new layer with each change. This allows you to always revert to your original image. If you don’t know how to create a duplicate layer, simply go to Layers>Duplicate Layer (Ctrl or ⌘J).
I’ll then draw a loose lasso around the object I wish to remove on this new layer using the Patch tool (hotkey J).

Check the Options bar to verify that the Content-Aware option is selected.
Step 2 – Drag to Replace Pixels
Select an area and drag it to a sampling point. If I can, I try to match any obvious lines. In this case, I tried to match the horizon line and the waves.
After I click OK, Photoshop analyzes the new pixels and applies Content-Aware Fill to fit them into their correct locations.
If I don’t like the result, I can simply press Ctrl + Z to reverse it. Then grab the patch and drag it to a new location.
The Patch option bar contains two more fill settings: structure and color. I’m telling Photoshop how closely to adhere to the shapes in the new content with structure. 7 means be faithful to the shapes. 0 means loosely interpret them.
All I have to do now is choose a color value. For color, I’m choosing how much color blending Photoshop should perform. The maximum number is 10. 0 means that there will be no color mixing.
This sort of image works best with the Patch tool. When it comes to more complicated pictures, I’ve discovered that patching the object into smaller pieces appears to be more effective.
Content-Aware Move Tool
Content-Aware Fill is good for removing things, but it’s also useful for moving them. I moved one of the cyclists to the other side of the road so that you can compare the before and after images.
Step 1 – Selection
First, press Ctrl + J to create a duplicate layer.
Select the layer and use the Content-Aware Move tool to move it. Draw a loose lasso around the item you wish to relocate.
Step 2 – Drag to Move Pixels
Drag the selected portion to the new location.
When you release, a transform box will appear around your selection. You may use this to adjust the material to fit into the new environment.

Click Return or the checkmark in the Option Bar to accept any changes. Photoshop takes the selected pixels and places them in the new location.
I use the same Fill settings as I did with the Patch tool: structure and color. They’re both used to cover up a hole caused by moving an item in this tool, just like they were in the Patch tool.
Content-Aware Fill Workspace
The Patch tool works well for simple adjustments, but the Content-Aware Fill workspace gives me greater control.
Let me show you the Content-Aware Fill workspace. I’m going to use this tool to remove that person from the image.

Step 1 – Selection
I start by selecting the object I want to remove with the lasso tool. Then I choose Edit>Content-Aware Fill. This opens the workspace.
There are three sections to this workspace.

The picture in the center panel is my picture. A preview of the Content-Aware Fill has already been generated by Photoshop.
The sampling area is shown by the far left panel, which is covered with a green border. I can improve the results by refining my sampling area.
The far left of the screen is home to a toolbar with a sampling brush tool, a lasso, a hand, and a zoom tool. This screen gives me more options to refine my sampling.
As you can see in the preview Photoshop did a great job in replacing the lady with rocks and water. If you are not happy with the result I’ll show you how to modify and refine the sampling area.
Step 2 – Refine Sampling Area
You’ll notice that the sampling brush tool is set to minus by default. You’ll be able to erase the unwanted area.
In case you want to add to the selected area, hold Alt and you will notice that the sampling brush tool minus sign turned into a plus sign. You’ll now be able to paint the green overlay in the sampling area.
I may wish to increase color adaptation in a more complicated image. I have four options: none, default, high, and very high.
If my choice is slanted, I might wish to apply a rotation adaptation. I have five levels to choose from: none, low, medium, high, and full. I also have the choice of scaling the picture or flipping it upside down.
When I modify these preferences, Photoshop warns me that the outcomes may be unexpected. If I don’t like the result, I simply undo it with Edit>Undo (Ctrl or ⌘Z).
When I’m satisfied I hit Ok to apply the changes and exit out of the Content-Aware Fill panel. By default, the area with Content-Aware Fill that was selected is saved as a new layer.
After some additional cleanup, here is the final result. I’ve discovered that Photoshop‘s Content-Aware Fill sometimes removes textures that I want to retain. To replace the texture, I used the Clone Stamp tool.
Extra Tool: The Content-Aware Scale
The Content-Aware Scale in Photoshop is a very useful tool that I use when I have to work with a vertical portrait image like the one below.

Let’s say you are creating a cover image and you need to extend your background to match your canvas. Before showing you how to achieve that, keep in mind that this feature works best with a simple and repeatable background.
First, increase your canvas size. Press C to select the Crop Tool and extend your canvas horizontally while holding Alt/Option.
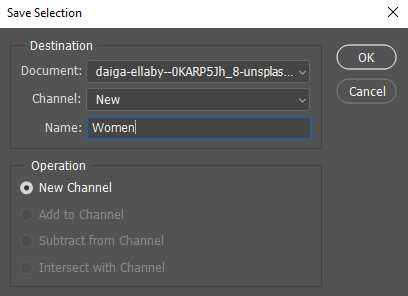
Next, in order not to affect the subject while extending the background, you’ll need to select it. Simply go to select > subject. Photoshop will be able to detect and select the subject automatically.

Once the subject is selected press M and right-click inside your selection. Choose Save Selection and name it women.

Undo your selection by pressing Ctrl + D and go to Edit > Content-Aware Scale. Protect the subject by selecting the selection you just saved in the top bar menu.

You can now stretch the background while holding Alt+Shift without affecting your subject. Remember that this technique only works with simple and repeatable background.

Conclusion
Photoshop content-aware fill tools assist you in moving or removing objects from your photos. Content-Aware Fill employs artificial intelligence to pick and mix the greatest replacement pixels.
The Patch tool allows me to select an object and choose pixels to put in its place.
The Content-Aware Move tool enables me to relocate a selected item, integrate it into its new location, and repair the space created.
The Content-Aware Fill workspace lets me define the sampling area. This Photoshop fill tool is far more delicate and responsive than the Patch tool.
To finish with, the Content-Aware Scale tool allows me to elongate a basic background and convert a vertical portrait into a landscape while preserving the primary subject in an image.
Photoshop‘s content-aware technology has improved a lot over the years, but it isn’t flawless. After you’ve moved or removed an object, you may have some cleaning to do.
It is now possible to move or remove objects or people from a background without anyone noticing.